
Please sign in so that we can notify you about a reply
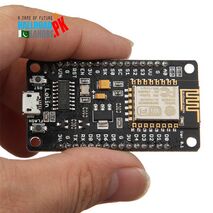
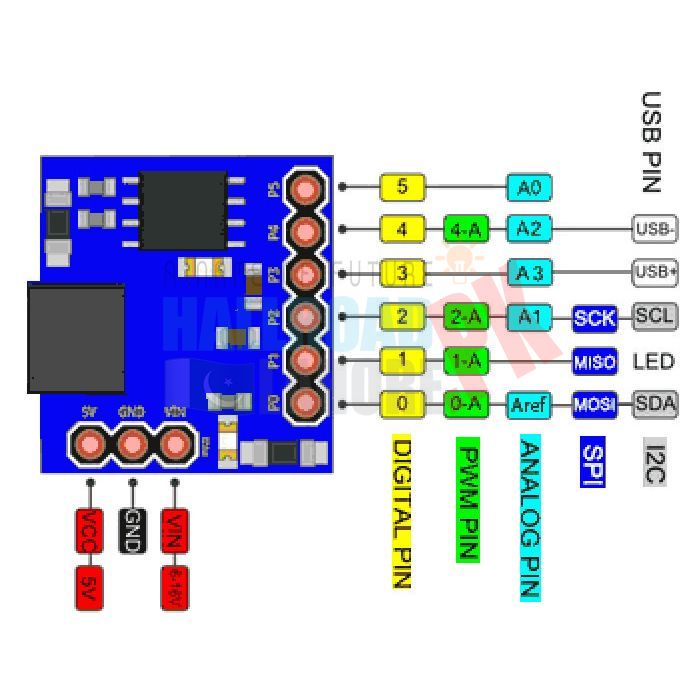
Arduino Digispark ATtiny85 with micro-USB is the smallest Arduino controller. Despite the small number of pins, the controller has serious functionality at its disposal (ADC, PWM, I2C, SPI, etc.). The controller provides you with six I / O ports, 2 of which are used for USB. You can also use all 6 ports in your projects, even if you program the controller via the USB port. The controller board uses automatic selection of the power supply from the micro-USB connector, from an external source of 5V or 7 - 35 V. For firmware of the controller and writing sketches, you can use the Arduino IDE. Thanks to its support for the Arduino IDE, Digispark is ideal for first acquaintance with Arduino. Use a development environment version not lower than Arduino IDE 1.6.5
How to upload a sketch to the ATtiny85 controller in the Arduino IDE
- 1 - Disconnect the microcontroller from the computer
- 2 - Press the "Upload" button in the IDE, after which the console will display information that you have
- 60 seconds to connect the controller.
- 3 - Connect Digispark ATtiny85 to the USB of your computer
- 4 - The sketch will start loading into the controller
- 5 - If everything went well, you can check the performance of your sketch
Main characteristics of ATtiny85 Arduino:
- Microcontroller: Ttiny85-20SU
- Built-in stabilizer: 5 V, 500 mA
- Connection type: micro USB
- Flash ROM - program memory: 8 kb
- RAM RAM: 512 bytes
- Interfaces: I2C, SPI
- PWM (PWM): 3
- ADC pins : on 4
- ADC pins : 10 Bits
- Timers: 2
- LED indicator: Power
- LED indicator: Test / Status LED
- Arduino IDE support: Mac OS X, Windows, Linux
Pin assignment:
All pins can be digital I / O
P0 - I2C SDA, PWM
P1 - PWM
P2 - I2C SCK, Analog input
P3 - Analog input (USB +, when using USD)
P4 - PWM (USB-, when using USD)
P5 - Analog input
Sketch Blink for Arduino ATtiny85:
void setup ();
pinMode (1, OUTPUT);
void loop () {   digitalWrite (1, HIGH);   delay (1000);   digitalWrite (1, LOW); delay (1000);
No posts found
Accesories

Customers also bought


Bestsellers

Featured products